
On the Easel: Sketches for The Other Side of the Mirror


These fine folks are sketches from the upcoming Sketchbook 2015: The Other Side of the Mirror, which will be a companion sketchbook to the hardback edition appearing later this year.
Annie and I are going to be doing something a little special this year with the sketchbooks! This year our sketchbook is going to be a joint sketchbook, and it is going to offer a heavy focus on step-by-step demonstrations on ink work, painting, and drawing.
We also have a few other surprises in store this time around which we will be announcing this month, so stay tuned!
Painting Toads

Renard and the Strawberries: Painting Demonstration
STEP 1: COMPOSING A SCENE


Justin and I had a very specific idea in mind for what the painting should be like in order for it to fit the narrative of the story. One of the themes we wanted to depict was the innocence and free spirit of youth, and the sense of a world full of possibilities and mystery.
Justin came up with some initial conceptual thumbnails to start with while I did several studies of animals and figures. Once we decided on an arrangement and narrative that we both liked, I began the final drawing.
STEP 2: BLOCKING IN COLOR


Determining a palette is very important for me before I start adding color washes. For this piece I knew I wanted to use a limited base palette of Green Umber, Raw Umber, Paynes Grey, Titanium White, and for the fox, Old Holland's Red Gold Lake. To thin the paint, I used Gamblin's Solvent-Free Fluid. (Remember to observe fat over lean! If you use too much oil, it will bead up on the surface.)
All of the base colors are applied in light layers. I like to keep the pencil lines visible to act as a guide as I build color. This step helps me determine the mood of the painting as well. Having a strong foundation will help me in subsequent steps, and makes the detailing process much easier for me. After I apply my base colors, I set the painting aside to dry. I need the painting to be dry because I like to drybrush in my shadows and highlights, and this works much better of a completely dry foundation.
STEP 3: PAINTING FUR
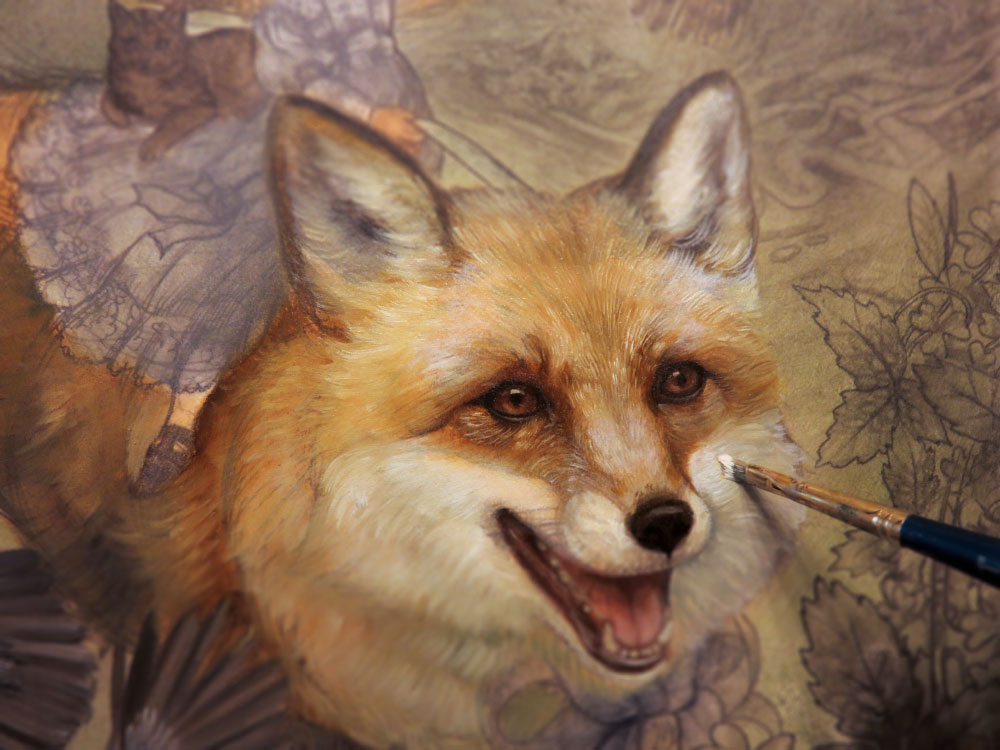
For this piece, I decided to start with the fox. Using Red Gold Lake mixed with Raw umber, I buff in the shadows of the fur. Mixing Paynes Grey with Raw Umber gives the darks I need for around the eyes and the nose. Titanium White mixed with small parts of Red Gold Lake are used for the highlights. I like to paint the individual hairs, and then smooth them using a wider soft brush. This way the fur is defined, but still appears soft. For the finer hairs, like the long ones around his ears, eyes, and whiskers, I like to use a sharp tipped brush (Pointed Round 3×0). For this step, I add a new color to my palette as well. Alizarin Crimson will give me all of the rosy hues I need for this piece.

STEP 4: WORKING IN THE FOLIAGE

Now I begin work on the foliage.
Starting with the dry base from step 2, I begin to block in the smaller details of the piece. In this case, it's the individual leaves, and the strawberries. By mixing Green Umber with Red Gold Lake a more vibrant leaf color is achieved. The strawberries are blocked in using Alizarin Crimson. To give the leaves more dimension, I highlight the top outer edge where the light would be hitting them using titanium white. As you can see in fig. 2, the colors are very stark. After this layer has dried, I soften it by applying a glaze of Green Umber mixed with Gamblin's Solvent Free Fluid (fig. 3). While the paint is still wet, I am going to add the same golden highlights to further define the leaves. After the sharp details are added with the fine tipped brush, I can go back soften them by dabbing them with a wider frayed brush. Lastly, I will add highlights to the strawberries using Titanium White mixed with Alizarin Crimson (fig. 4). These steps are repeated for the rest of the foliage in the piece.

STEP 4: ADDING SOME FEATHERS
Much like the fox, I buff in the shadows and highlights for the birds in the painting using the dry base from step 2 (fig. 1). The feathers are created by dabbing the brush onto the painting. The feathers will will rough and chunky initially (fig. 3), but by gently dabbing them with a frayed dry brush using the same manner as the fox's fur you can achieve a softer finish (fig. 4).

STEP 5: PAINTING ELIZABETH AND CHARLEMAGNE
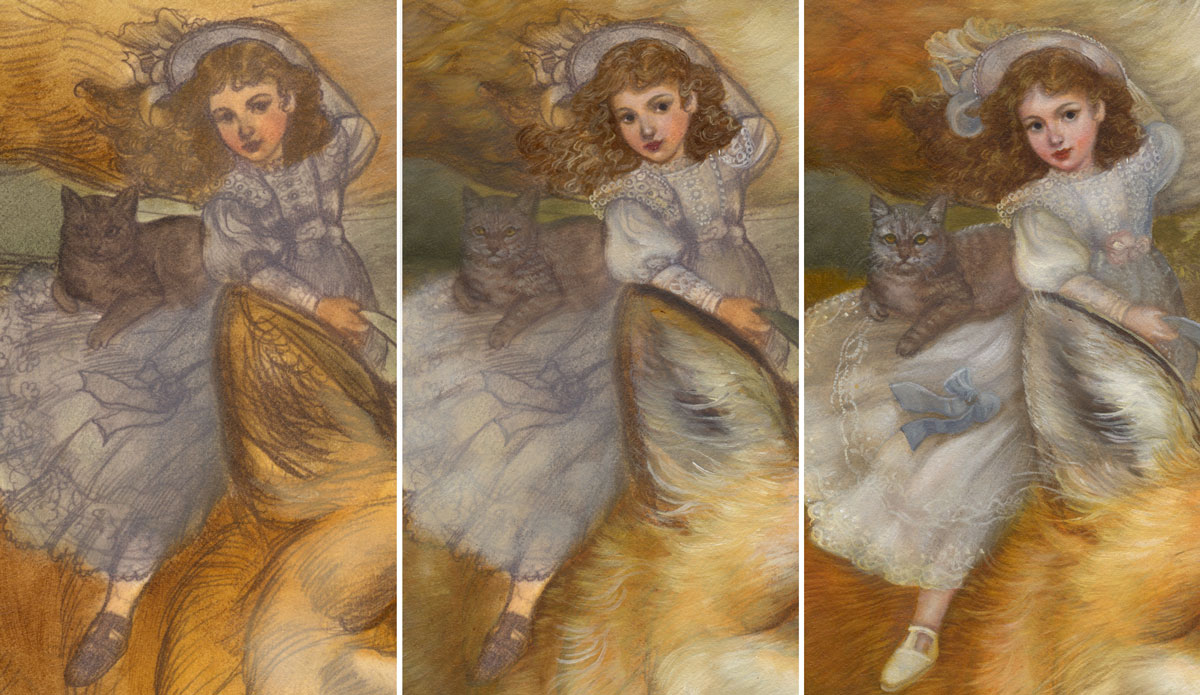
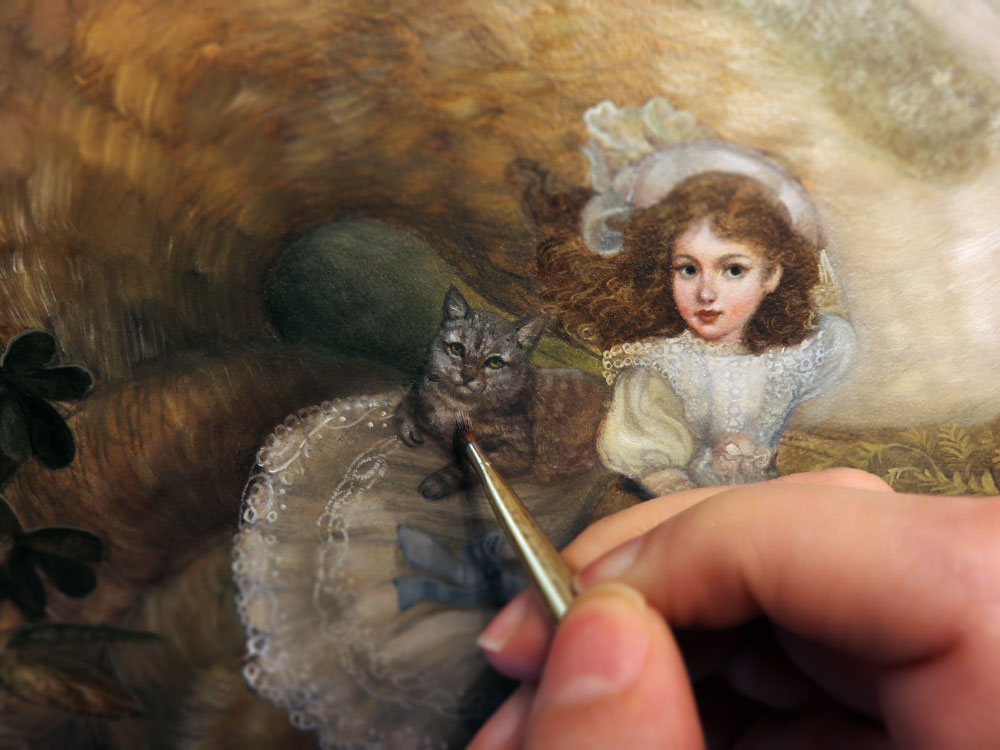
For the little girl's skin tone I mix Titanium White with Red Gold Lake and Raw Umber. Small amounts of Alizarin Crimson are added to the cheeks and lips. For the finer details, like the lace trim on her dress, Titanium white is thinned using Gamblin's Solvent-Free Fluid. Her hair is painted using Raw umber as a base. For warmer highlights, I mix Titanium White with Red Gold Lake to warm them.

STEP 6: FINISHING UP

"Renard and the Strawberries", 12x16, oil on board
Lastly, I add a unifying glaze with a very thin amount of medium and subtle warm tones. And now we are finished! From start to finish the whole process has taken about three and a half weeks of work.
This painting, along with 8 others will be appearing in our book, The Other Side of the Mirror, later this year at Gallery Nucleus. Please check back in over the next few months as we release more demos and preview work! You can see some working steps of the other images in the series as we create them here.
New Sketching Tutorial

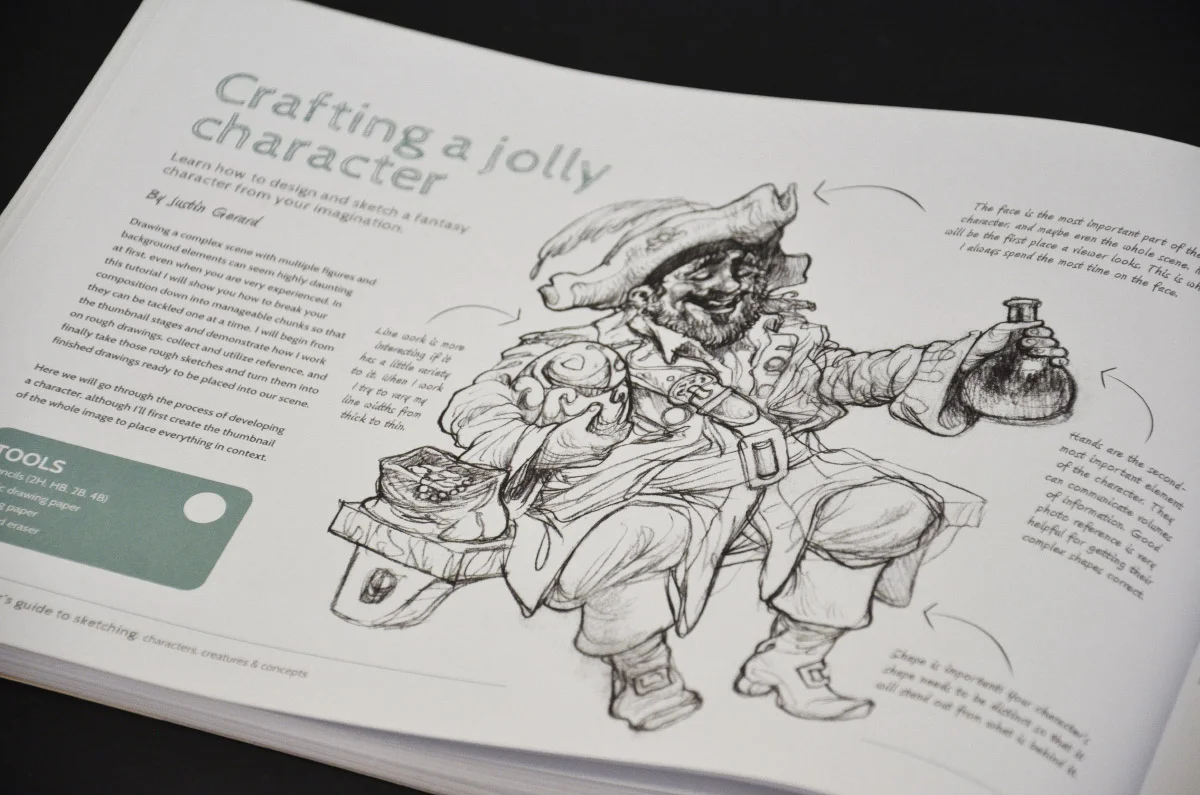
Hey guys, recently I put together a sketching tutorial for 3DTotal! It also features artists Brun Croes and Sylwia Bomba and focuses on character design and drawing techniques. Check it out here!


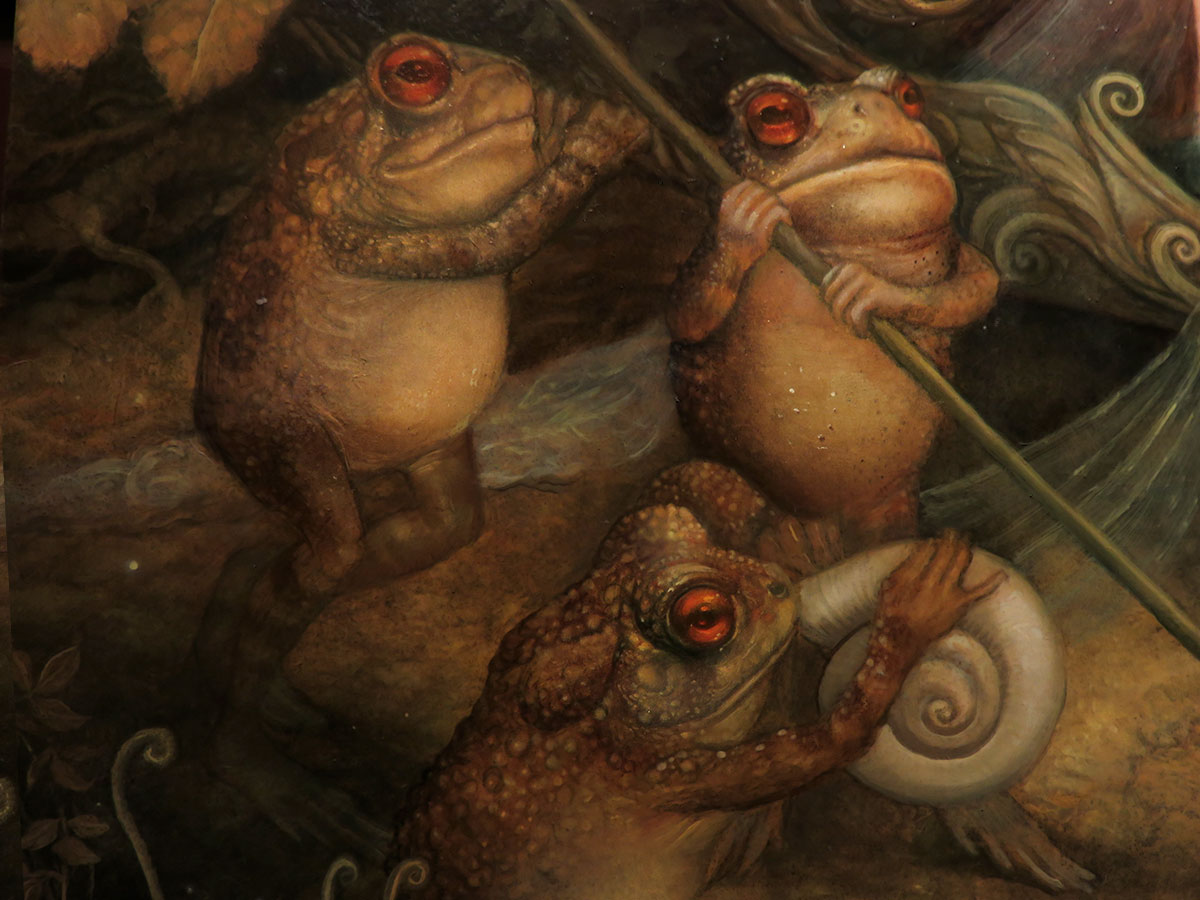
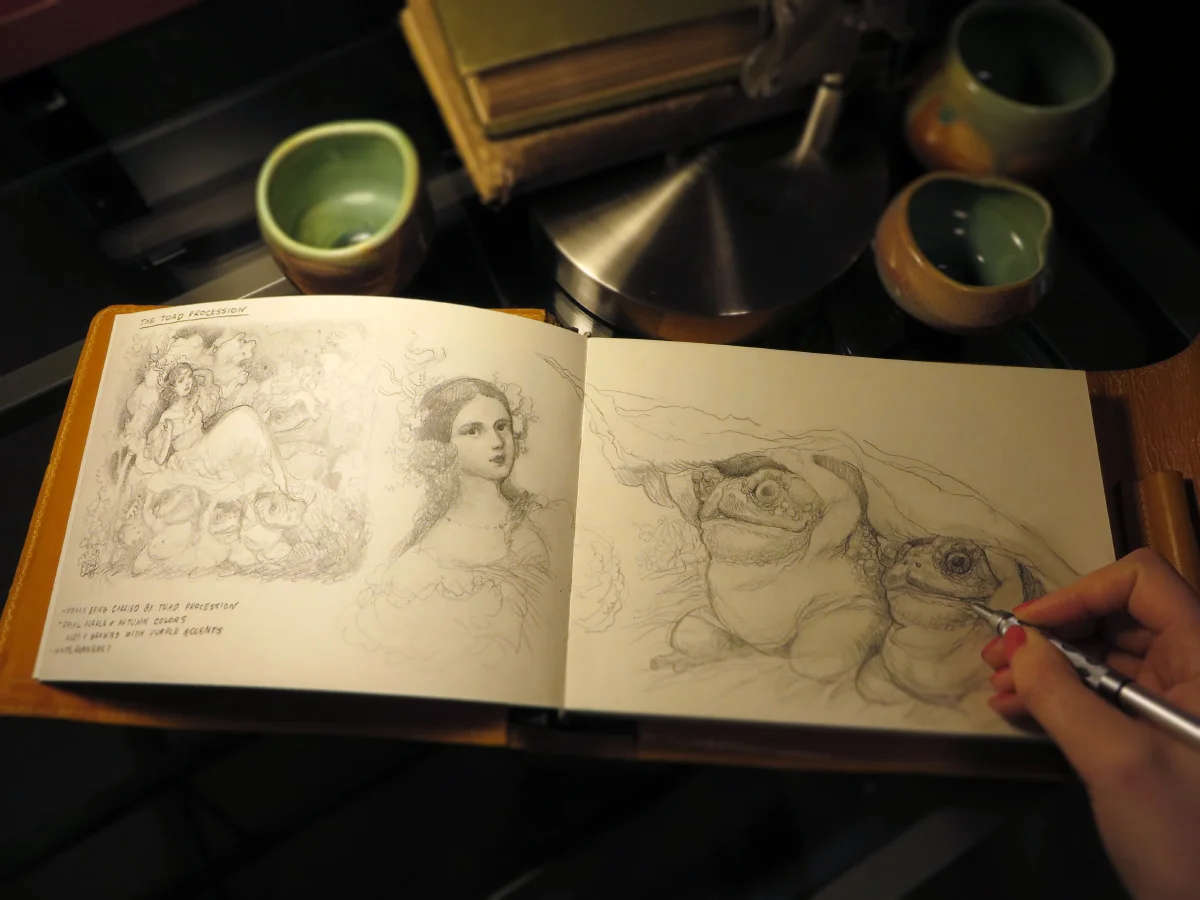
A Toad March

The drawing for the next image in the series. I have been very excited about starting this one for awhile. And yes... Justin posed for every one of those toads!
Almost finished....
I like to step away from a painting in the last stages to get a better sense of where the painting needs to be for completion. In this case, I will be putting Renard aside to work on a short tutorial which will be available soon. In the meantime I am ready to start on my next piece for the series that I am very excited about. It involves some of my very favorite creatures! I will be posting the sketch on Thursday.

12x16, oil on board
Quail

12x16 oil on board

Many times I am inspired by nature and places I have visited when I come up with scenes to paint. For this piece in particular, Justin and I had just gotten back from California where we visited some of the most beautiful landscapes I have ever seen. Here are some of the pictures I took while driving up the coast. Unfortunately I did not see any foxes, but I did stumble upon a large orange cat who's palette I fell in love with.
Itty bitty kitty

12x16 oil on panel
Painting Renard

12x16 oil on board
Renard Ink Progress

Renard and the Strawberries


The Hunt for a Non-Toxic Solvent: Part III
By Justin Gerard
Back in May of 2011 I wrote an article on Muddy Colors detailing my on-going search for an oil painting medium that would provide me with the following characteristics:
1. Workability - That the paint itself allows for the smooth, buttery application consistent with that of traditional oil paints.
2. Archival-Longevity - That the final product will not suffer from any unreasonable, long-term degradation. (cracking, colors fading or darkening, wrinkling)
3. Fast-Drying - That if needed, a thin layer could be touch-dry, ready-to-paint-over, within 24 hours, but the medium itself stays workable for at least 8 hours.
4. Non-Toxic - That you can work solvent-free and in a non-toxic studio environment.
It was easy to find a medium that would offer three but seemed impossible to find a suitable one that would offer all four. Now finally, four years later I believe that I may have found a solution:
Enter: Gamblin’s Solvent-Free Fluid
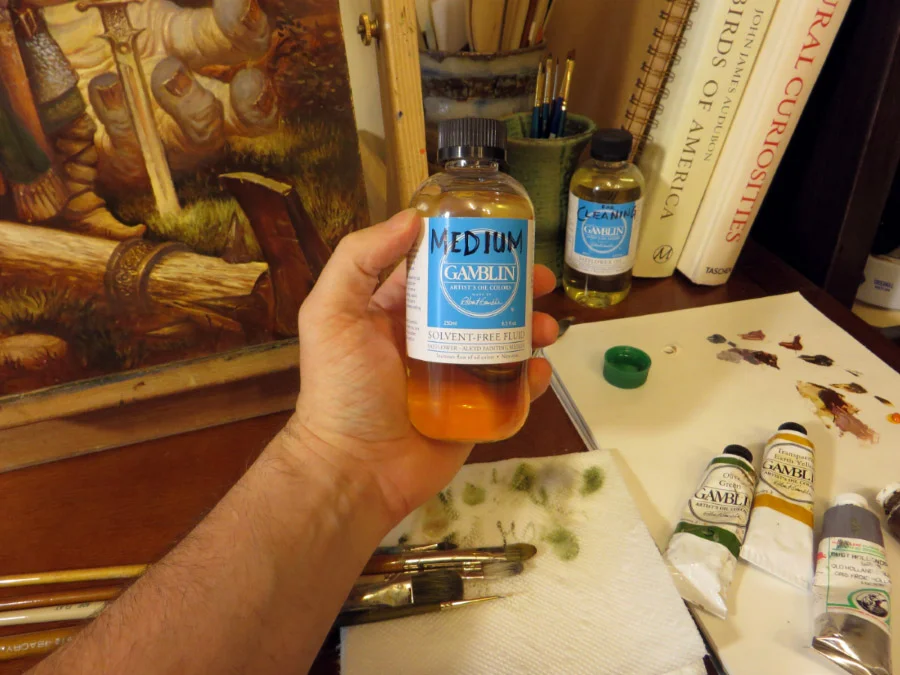
The folks at Gamblin recently created this medium by adding an soy-based alkyd drying agent to Safflower oil. Safflower oil is wonderfully fluid and a pleasure to work with, but has the drawback of taking forever to dry. So for painters who are interested in painting indirectly using several layers, it can be problematic.
How is Gamblin's Solvent-Free-Method more similar to solvents than other mediums?Previously I had been using mediums based on either sun-thickened linseed oil or M. Graham’s Walnut Alkyd medium. Compared to these mediums, this medium is incredibly fluid and much more workable.
It is much easier for me to get quick coverage of an area, and then simply not add any fluid if I want to slow down and paint an area with more control.
I found that if I need to carve out an area that I had already painted, (to sharpen the edges of a glaze for instance) that it allowed me to do this far more easily than other traditional mediums.
In general, I found that it allowed for a broader range of brushwork techniques than other mediums.
How is it different from working with actual solvents?
Compared to odorless mineral spirits it is still highly fluid, though not quite as fluid as OMS. I did however, find that it was close enough for my purposes.)
The main difference that I can see is that OMS evaporates as it dries, so your layer is extremely thin and there is very little build up. With Gamblin Solvent-Free Fluid you will have slightly more build-up since the medium does not evaporate and remains in the paint. Because of this Gamblin recommends never mixing more than 25% Solvent-Free Fluid with your paints.
Is the drying time noticeably better than traditional mediums?
Yes! I found that thin layers were dry in about 24 hours. While this was generally slower than OMS mixed with galkyd, liquin or a cobalt dryer, it was still much faster than other traditional mediums. I would compare it to the drying speed of M. Graham’s Walnut Alkyd Medium but with far more workability.
Is it easy to clean?
Yes. Gamblin recommended using Safflower oil for cleaning brushes so I decided to try that and was really pleased with the results. You definitely don’t need any turps or solvents to clean with this medium. If you need to get your brushes clean for longer storage, a simple bathroom cleaning glove and a bar of soap and water will suffice to get your brushes perfectly clean.
A note on cleaning: The medium itself will stay open on your palette for several days. The tiny cap in the picture above stayed open and usable for several days, even while the thin layers on the canvas dried overnight. This amazed me since I had not sealed it in any way and planned on throwing it out the next day (which is what I would have been forced to do with other alkyd mediums).
This is good news as it means that even if you forget to clean your brushes the night before you will have no trouble getting them clean the next day.
A second note: Gamblin’s Safflower and their Solvent-Free Fluid look the same. This confusion led to studio mishaps, where Annie and I accidentally used the wrong one and couldn’t figure out why our paintings hadn’t dried in a week.
This is why the bottles now have hastily scrawled titles to keep them separate. Never again.
I’M LOOKING AT YOU GAMBLIN LABEL DEPARTMENT.
Would you recommend it?
Yes I would. It has been an absolute pleasure to work with so far and has gotten me excited about oil painting again.
My final verdict is if you do not have any trouble with turps and mineral spirits, you might find that OMS mixed with galkyd or liquin will work better for you. But if you are wanting to go non-toxic and solvent-free, then I would absolutely recommend this product.
I will add one last word of caution that this is a new medium which has not had time to be heavily tested for its long-term archival quality. As with any new medium, we can't know exactly how it will look in 100 years. But the ingredients list seems clean and simple (which is always good for oil paint) and I feel like Gamblin is a trustworthy company which tests its products heavily and has a long history of providing excellent, archival painting materials.

As always, if you have found an oil painting medium out there that you believe meets the 4 challenges above let me know in the comments and I will test it out!
Further Reading:
Link to Dan Dos Santos Write-Up on Studio Safety: Solvents
Link to Gamblin's Mediums section
Sea Songs

"Sea Songs", 30x40, oil on board SOLD
Mother of Dragons

"Mother of Dragons" 36x24, oil on board, June 2015


Spectrum 2015 Wrap Up
We just got home from our week in Kanas City, Mo for Spectrum Fantastic Art Live 4. What an amazing show!
The awards ceremony was held in the Folly Theater, which was built in 1900. Here is a shot of all of the nominees! I was so nervous for them. Every single one of them is extremely talented, and picking the winners this year was very difficult. I think we deliberated along with Greg Ruth, Dice for over 5 hours! The awards this year were GORGEOUS. Kristine and Colin Poole did an incredible job. To see some pictures visit the Flesk Publication blog
Congratulations to all of the winners.. you made our job very tough!

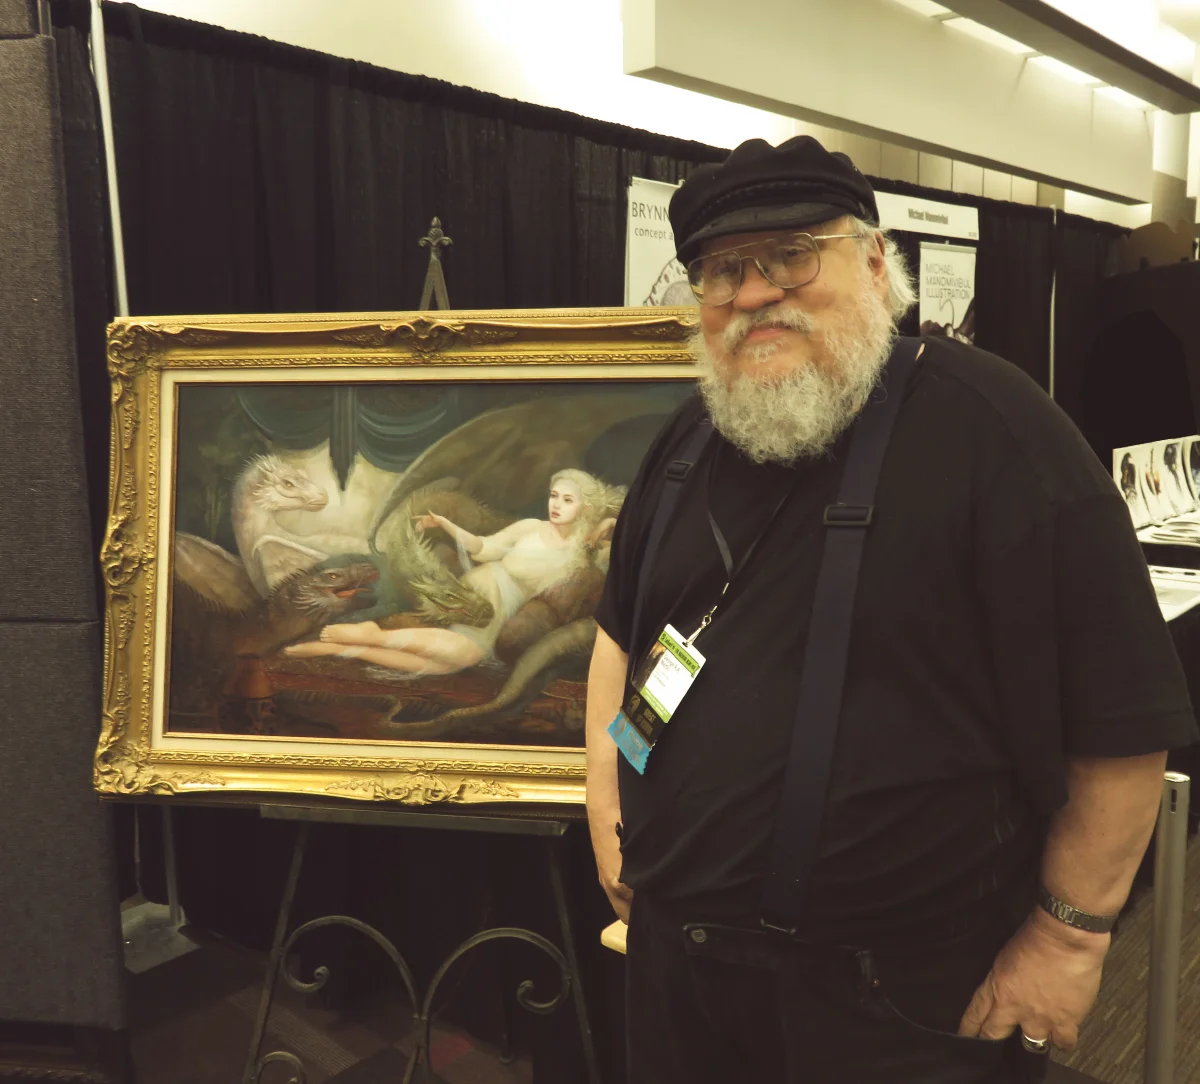
This year's event coincided with ConQuesT 46, where George RR Martin was attending as one of the Guests of honor. On Sunday he stopped by our booth, and we got a picture with my Daenerys commission.

Justin and I were on a panel with the amazing Colin and Kristine Poole, Iain McCaig, Gerald Brom and John Fleskes to talk about the spectrum awards and judging process this year.

Photo by Jeff Smith

We also got a copy of Cathy Fenner's new book, Women of Wonder, which showcases women creators of fantastic art. It has a lovely introduction by Lauren Panepinto. I am ecstatic to have been included with my piece, The Forest Procession, alongside so many artists that I admire. You can read more about the book here.

Thank you to everybody who stopped by to chat. We had a wonderful time hanging out with you guys and can't wait to see everyone again in 2016!
Spectrum Fantastic Art Live 4
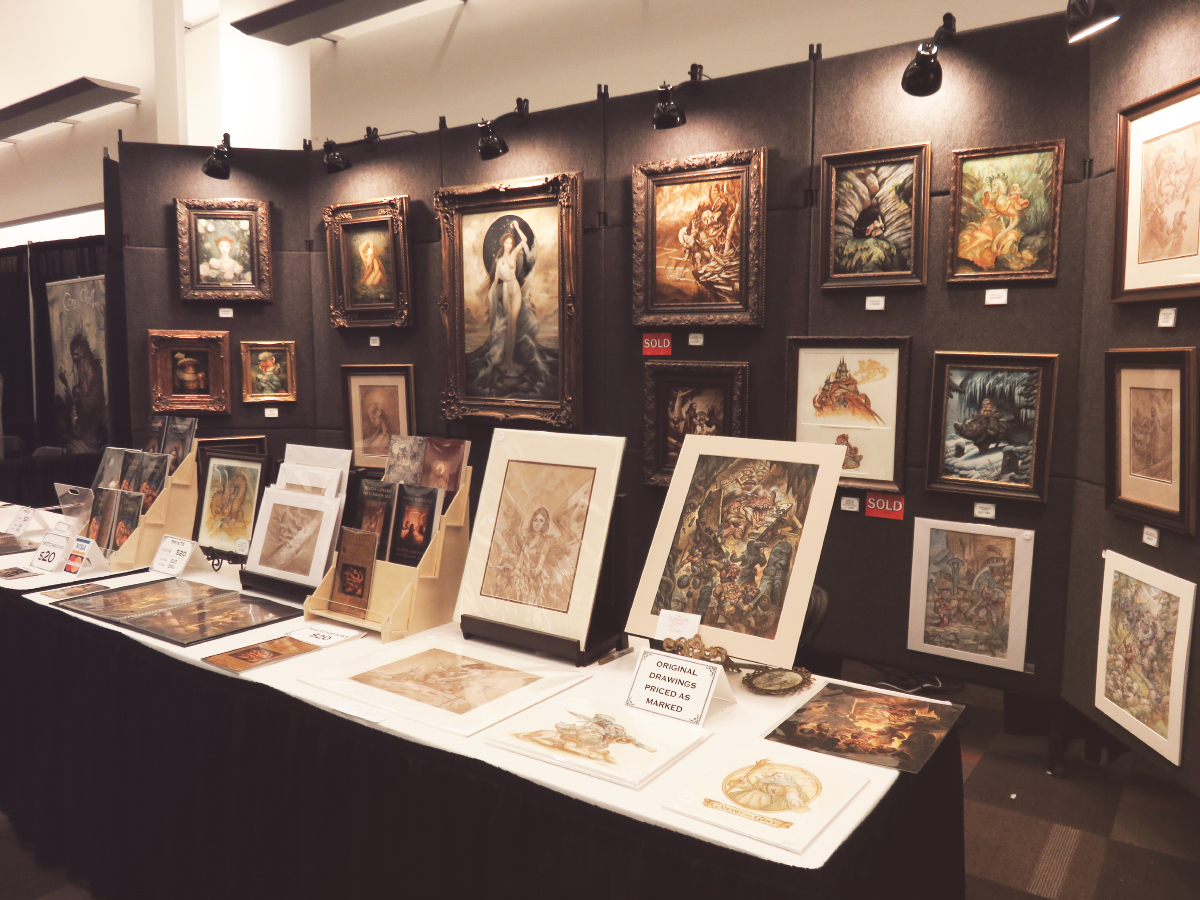
This coming weekend Gallery Gerard will be in Kansas City, MO for the fourth annual Spectrum show. Stop by our booth for original paintings, drawings, prints, sketchbooks, live painting...or just to chat! We will be in booth 307&309.
On Saturday at 12:00pm, join us in Room #2101 to talk about the Spectrum 22 judging process.
Free Prints!
The first 5 people to buy a sketchbook from our booth will receive two of our miniprints! Both images will be appearing in the new Spectrum 22 book.

ere are some sneak peeks of the originals that we will be selling at the show this year. See you there!

"Moonchild" Annie Stegg Gerard, 24x36 oil on board

"The Wrong Door Study" Justin Gerard

"Awakening" Annie Stegg Gerard, 11x14 oil on board


Toned Drawings, Justin Gerard
The Last of His Kind

"The Last of His Kind"
by Justin Gerard
11" x 14"
Oil and Digital
I will be displaying the original in Kansas City at Spectrum Live next month. The original is painted on panel in monochrome oils. To see more of the development work visit the previous post here!

24x36 oil on panel
On the Easel
Limnaee of the Lake
A new piece for Krab Jab Studio's couples show, Marriage is a Work of Art opening this Saturday, Apil 11th at 6pm-9pm PDT.
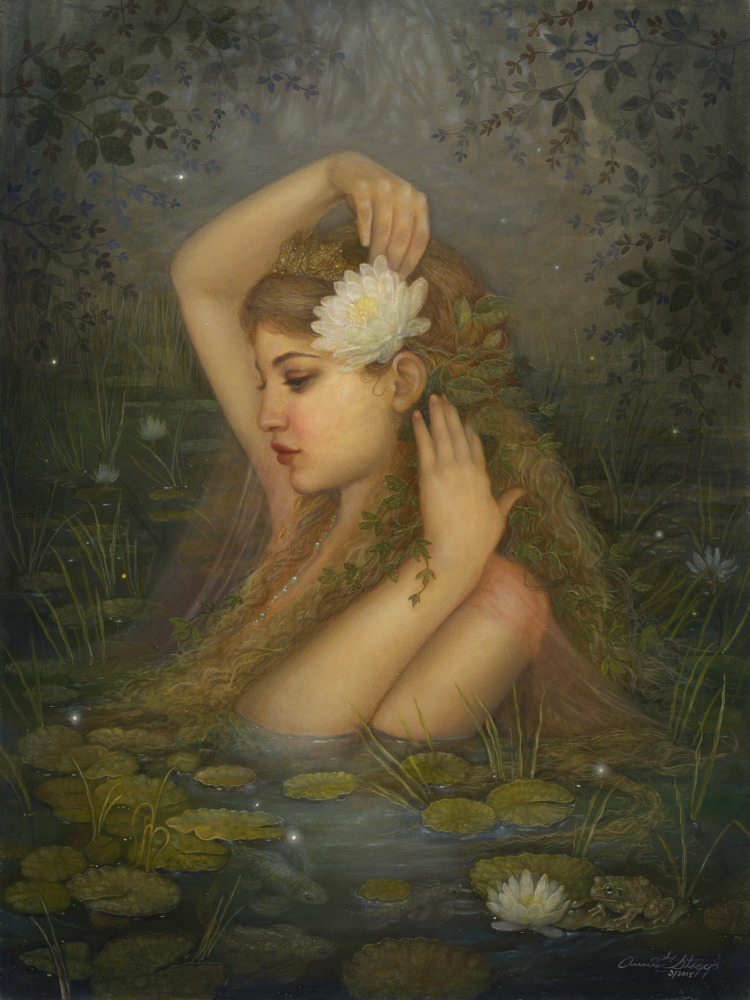
12x16 oil on panel
I will also have the drawing available for purchase at the show!
